Changing the URL of an existing page on your WordPress site without creating redirects could hurt the website’s user experience and your digital presence, regardless of your many good reasons for doing so. You can implement WordPress redirects on any of the best web hosting services.
Let’s say you have a page with a URL yourdomain.com/ballet-shoes/, and for the sake of changing your site’s structure, you renamed the URL to yourdomain.com/foot-wears/ballet-shoes, which could also improve the page’s SEO. Though the new structure makes a lot of sense to you and to the SEO, in keywords search, you have successfully denied old users access to the page and possibly new visitors if Google had indexed the page.
Google has no means of knowing that the page has been moved into the foot-wears folder by itself. Hence, it will continue to show visitors the old URL, so even if your design, WordPress security, navigation, and other factors are on point, you’ll still be in the deficit when it comes to your old visitors who didn’t find your new online home. Similarly, the page’s old users who had bookmarked the URL would also be directed to a dead-end (404 error page) when they try to access your ballet-shoes page through the old link.
This is why you need to implement redirects as a means of communicating the moved page’s new location without denying anyone access to them.
And while you are in the process of creating redirects, you should probably also create an under maintenance page for your site. This will stop users from hitting 404 error pages and will let you finish everything in peace. Now, how do you create one? Well with Coming Soon & Maintenance Mode of course!
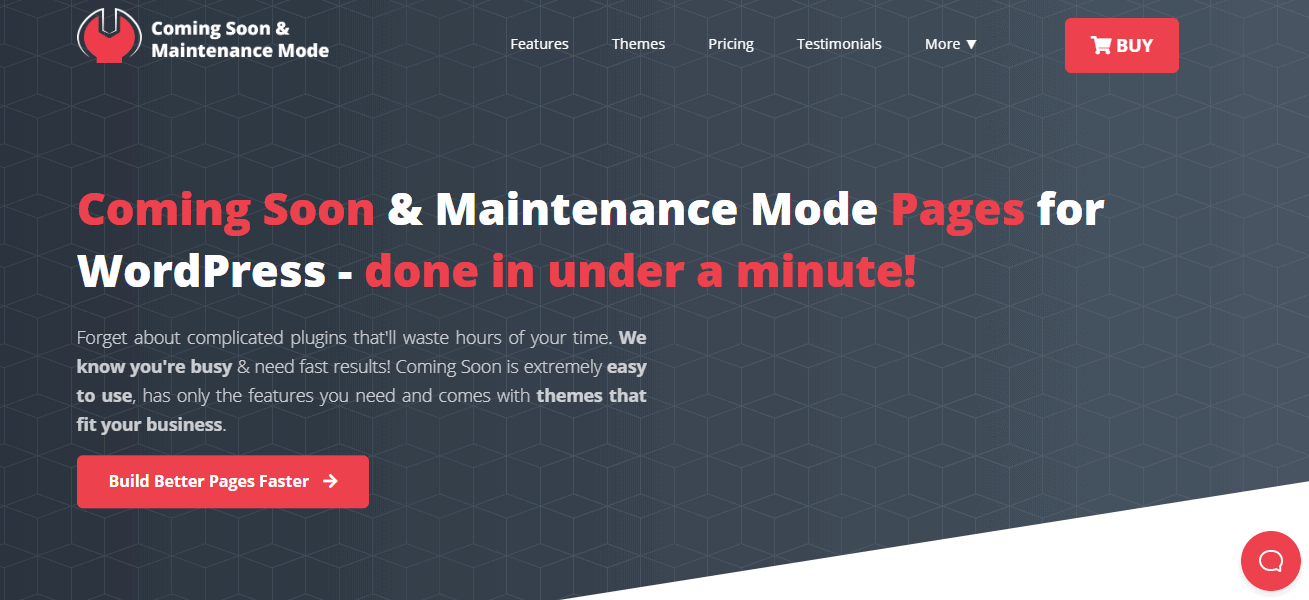
This plugin will come with a drag-and-drop builder and 170+ themes which will make creating the page a 5-minute task. On top of that, you will also have the option of using images directly from Depositphotos, best-in-class SEO setup, autoresponder and emailing services, and many other features that will enrich the page significantly.
However, the example above is not the only scenario that would require you to create redirections.
In this article, we will learn about redirects, types of redirects, when you need redirects, common redirect issues, how to identify when you need redirects, and how to create redirects in WordPress.
What is the meaning of redirects?
Redirects or URL redirection refers to the automatic process of sending a user to a different destination (URL) from their requested URL. Redirection is what happens when a website user who requests for page A was taken to page A*, which is considered an alternative page to A or its equivalent.
URL redirection, which can be implemented in several ways, is said to be successful when the user arrives at the destination URL.
How redirects work in WordPress
When a URL is pointing to a different destination, the server will pass a 3xx HTTP status code along with a location ‘header’ containing the targeted URL each time a user requests for the URL. The status code is sent to the agent (the users’ browser), which will respond accordingly.
For instance, the HTTP response for 302 redirects response is HTTP/1.0 with a description phrase “Moved Temporarily” rather than the usual server response “Found.” It would have this look:
HTTP/1.1 302 Moved Temporarily
Location: http://www.example.com/
Types of redirects and when to use them
There are five (5) major types of redirects you can implement on the server-side, i.e., redirections triggered by the server. You can create any of these redirects on your WordPress site manually or using a redirect plugin. However, your redirection needs should determine which of these redirects you want to use.
- 301 redirects (moved permanently)
- 302 redirects (found)
- 303 redirects (see other)
- 307 redirects (temporary redirects)
- 308 redirects (permanent redirects)
301 redirects (Moved Permanently)

This is the most common type of redirect because it’s always the first choice for search engine optimizations. 301 redirects indicate that the page is permanently moved to the destination URL. These redirects are by default cacheable but can be overridden using explicit cache controls on your browser.
When to use 301 redirects
301 redirects should be used when you want to transfer all SEO value of a page to a new destination when the page’s URL has been changed permanently. 301 redirects prevent dead ends within your website while consolidating incoming links and preserving the page ranking authority.
Here are a few examples of cases where you need to use 301 redirects on your WordPress site.
When you move a page permanently
Old URL: http://www.yourdomain.com/
New URL: http://www.yournewdomain.com/
When you move a document permanently
Old Signup form page: http://www.yourdomain.com/signup_form.html
New Signup form page: http://www.yourdomain.com/contact_form/
When you change site structure permanently
Old URL: http://www,yourdomain.com/ballet-shoes/
New URL: http://www.yourdomain.com/foot-wears/ballet-shoes/
When you shut down a separate mobile site after building a responsive design
Old URL: http://m.yourdomain.com/
New URL: http://www.yourdomain.com/
When you discontinue a service or product and redirecting customers elsewhere
Old URL: http://www.yourdomain.com/service1
New URL: http://www.yourdomain.com/elsewhere
Others include when you want to change your website’s protocol permanently, such as migrating from HTTP to HTTPS; while resolving canonicalization where your domain would load using non-www and www; trailing slash problems and in a while resolving case sensitivity.
302 redirects (Found)

A 302 redirect which is a Found status code indicates that the requested URL has been moved temporarily to a destination URL. Unlike the 301 redirects, the 302 redirects are not, by default, cacheable and don’t indicate that the final URL should be indexed. Hence, search engines do not recognize the destination URL as an equivalent to the original URL or pass the page’s ranking.
When to use 302 redirects
302 Redirects are used when you require temporary redirects that would not affect the original page’s ranking.
Here are a few examples of cases where you should use 302 redirects
- AB/Testing. Google recommends 302 redirects in all your page experiments involving redirects
- Device targeting.
- Geo-targeting
- Pages for reoccurring temporary content. Example: pages with seasonal products
- When a page is under maintenance
303 redirects (see other)
303 redirects are similar to 302 redirects but more unique. Unlike the 302 redirects where redirections could become cacheable after a certain period, the 303 redirects are temporary redirections that can never be cached, bookmarked, or refreshed. A 303 redirect destination URL is only viewed by the user when certain conditions, which can only be repeated through a rigorous/secure process, are met. A 303 redirect is the status code you would see when you are making an online payment.
When to use 303 redirects
A 303 redirect is used when you need to prevent duplicate submissions, which are common when a user clicks the back button in a browser. It is used to prevent data accidents and in providing specific responses to user requests based on the data they have provided. 303 redirects are mostly used on credit card payment forms.
307 redirects (temporary redirects)

307 redirects are also similar to the 302 redirects and slightly more like the 303 status code. It’s a temporary redirect that cannot be cached by default. Introduced with HTTP/1.1 status code, 307 redirects behave more like the 302 redirects but are more precise in stating that the requested URL has been moved to a temporary destination URL.
When to use 307 redirects
Most times, 307 redirects are not an option since many crawlers treat them as 302 redirects. You can use a 307 redirect during website maintenance, but only when the search engine crawler has identified the server as HTTP/1.1 compatible. However, most crawlers treat a 307 redirect the same way as a 302 redirect. And you cannot use 307 redirects without approval that the client supports HTTP/1.1, which is quite difficult to determine.
308 redirects (permanent redirects)
A 308 permanent redirect indicates that the requested URL has been permanently moved to a different URL, just like the 301 redirects. But there’s a little difference. The 308 redirects status code requires the agent (browser) to repeat all future requests using another URL, whereas the 301 redirects status code requires the destination URL to receive all future requests.
When to use 308 redirects
A 308 redirect is the option when the original request method should remain unchanged each time the link is used. It can be used as an alternative in all 301 redirects mentioned above and other similar cases such as when you are using the POST method to migrate a complex website with so many forms and when you are moving a form action URL that would require a POST request.
Common redirect issues in WordPress
There are cases where redirection would occur more than once (redirect chains) following a single request from the user. Though this is not entirely bad, it could create problems and affect your site’s SEO. Redirection could end up in a loop where there is an infinite number of redirections.
Redirect chain
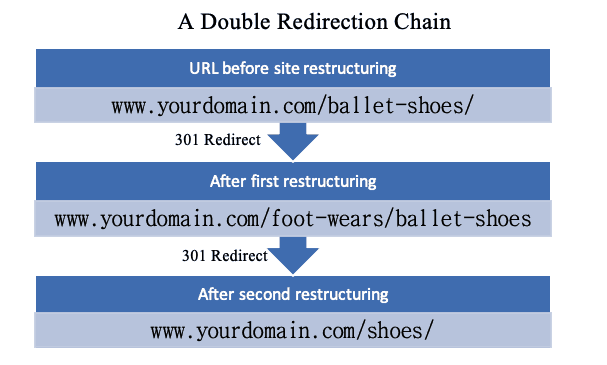
A redirect chain is when redirection occurs more than once between the requested URL and the destination URL. URL redirection should have a single phase when a URL is redirected. But for some reason, we end up with a redirection chain inadvertently.
Let’s say you had redirected users to your current ballet-shoes page after restructuring your website, and two years later, you decided it’s time to collapse all ballet-shoes into shoes/ page. And the new URL for reaching your ballet-shoes page looks like this:
www.yourdomain.com/shoes/
What would happen if you redirect yourdomain.com/foot-wears/ballet-shoes to the one above without doing the same for the very first ballet-shoes page? Redirect chain.
The first URL will still redirect users to the second URL, which is now redirected to www.yourdomain.com/shoes/.
The redirect chain can leave a negative impact on user experience and the website’s crawl budget. It lags your website response time; pages with redirect chains take a longer time to load, which is a turn off for many users. And too many redirects can result in error warning once the redirect limit is reached. The impact of the redirect chain on a website
While redirect chain may have no impact on your page ranking since Google search bot can follow a chain of multiple redirects, it’s advisable to keep redirect chain as minimal as possible. Google search bot cannot follow more than three redirects in a redirect chain. The search giant has advised publishers not to have more than five redirect chains on their website.
Redirect loop
A redirect loop happens when two or more URLs keep redirecting back to each other, which results in an infinite number of redirects. When this happens, the users’ browser will declare the occurrence of a redirect loop after executing a number of redirects (usually 21, depending on the browser) and will stop further redirections.
Redirect a loop is simply a form of redirect chain where the URLs involved are somehow pointing towards each other.
Other common redirects issues include using the wrong redirects; usually, 302 redirects rather than 301 redirects, incorrect use of the canonical tag, and linking to a non-canonical form of URL.
How to create redirects in WordPress
There are two methods of creating redirects in WordPress; the manually process by editing the .htaccess file and the automatic process by using a plugin for redirects. The former process requires the user to have a little knowledge of coding and guidance while the use of a plugin to create redirects does not require any coding knowledge or experience.
How to create redirects manually through the .htaccess file

Creating a redirect through the .htaccess file should only be ideal if you have, at least, a little coding experience. It could also be an option if you currently don’t have access to your WordPress dashboard.
But before you go run off making changes to your .htaccess file, it would be best if you created a backup of your website and installed a resetting tool like WP Reset so you can take your website back to its original state in case anything goes wrong.
There are two ways you can access and edit your .htaccess file so as to include your redirects.
The first option is to edit the .htaccess file using an FTP client, and the second is to edit the file directly through the File Manager feature on your cPanel dashboard.
Using an FTP client
- Login to your server using an FTP client.
- Go to the public_html directory to view the content on your server-side.
Ensure that you set your FTP client to view hidden files.
- Find the .htaccess file on the list of files and download the file.
- Open the .htaccess file using any text editor such as Notepad++ or your regular Notepad.
- Scroll down to the bottom of the document, move to a new line, enter your redirect command lines and save.
- Go back to your FTP client and upload the edited copy of your .htaccess file.
You are advised to keep a backup copy of your .htaccess file before effecting any change in case something goes wrong. This could be done by renaming the copy on your server to something else like “old .htaccess” instead of overwriting it.
For a 301 redirect your code may look like this:
RewriteEngine On
Redirect 301 /old-address/ https://yourdomain.com/new-address/
Using the cPanel File Manager
- Go to your cPanel dashboard
- At the “Files” section, click on the “File Manager.” This will open the file manager page in a new tab.
- Click on the public_html folder in the column by the left. This should open a list of files and folders in the right column. Move on to the next step if you are not able to find the .htaccess file on the list.
- Click on the “Settings” button at the top right corner of the page. In the preference popup window, check “show hidden files” and click on save.
- On the refreshed list, find and click on the .htaccess file. This will activate some options at the File Manager menu bar.
- Click on the “Edit” icon at the menu bar. This will trigger a Text Editor popup window
- Select “utf-8” in the character encoding dropdown menu and click on the edit button. This will open the .htaccess file in a new Text Editor window.
- Scroll down to the bottom and insert your redirection code in a new line.
- Click on the “save changes” button at the top right of the window and close the Text editor window.
New websites may not have the .htaccess file in their public_html folder. In this case, you have to create one. To create a new .htaccess file, follow these steps
- Click on the “+ File” icon on the File Manager menu bar. This will open a “New File” popup window.
- Enter .htaccess in the box below “New File Name:”
- Ensure that “/public_html” is in the box below “New file will be created in:”
- Click on the “Create New File” button.
A new .htaccess file will be empty and can accept your redirect commands once created.
How to create redirects using a WordPress plugin
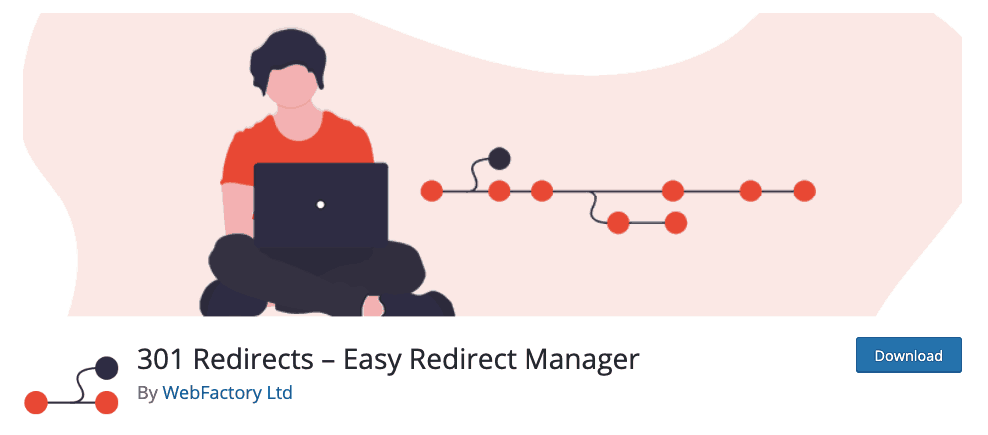
The idea of using a WordPress plugin in setting up redirects is to make the processes hassle-free, much more user-friendly, and without having to write any codes. 301 Redirects plugin is one of the best free redirect managers out there for implementing redirects in WordPress. While choosing a plugin for redirects, you want to make sure that they offer fast redirections and include other important features such as your ability to set up a custom destination URL, retain query string across redirects, manage bulk redirects and as well as monitor your redirect statistics.
First, you need to install the plugin for redirects onto your WordPress site before creating any redirects. You can install the EPS 301 redirects plugin by either downloading a copy and installing it through your WordPress dashboard or finding and installing it through the search plugins feature.
Installing redirects plugin on your WordPress site
- Login to your WordPress dashboard
- Click on the Plugins section > Add New
- Enter “EPS 301 redirects” in the search box and hit the enter key. This will display the search results (a list of plugins) below the search box.
- Find “301 Redirects – Easy Redirect Manager” by WebFactory Ltd on the list.
- Click on the “Install Now” button beside the plugin icon and click on Activate after the installation.
Alternatively, you can download a copy of the 301 redirects plugin from wordpress.org and install it manually on your WordPress site. To install the downloaded copy, follow the steps below.
- Login to your WordPress dashboard
- Click on the Plugins section > Add New.
- Click on the “upload plugin” button.
- Scroll down and click on the “browse” button.
- Locate the downloaded .zip file of the EPS 301 redirects plugin in the popup window.
- Click on the install now button and activate the plugin once the installation is completed.
Creating redirects in WordPress using 301 redirects plugin
After a successful installation and activation of 301 redirects on your WordPress site, the plugin should appear in the settings section on your WordPress dashboard or admin panel. You can create a redirect by following these simple three steps below.
- Click on settings > 301 Redirects on your admin panel. This should load the EPS 301 Redirects dashboard.
- In the box below, “Redirect From” section, enter the requested or old URL and enter the destination URL in the box below the “Redirect To” section.
- Activate the redirect by clicking on the save button.
You also have many other options in step 2 while creating your redirects. A click on the dropdown menu will allow you to choose a preferred destination on your WordPress websites such as a media, post, or a page that already exists on your website.
There is also an option to manage bulk redirects by uploading a list containing all your requested URLs and their destination URLs in a CSV format. This could be achieved by clicking on the Import/Export Redirect Rule button on the 301 Redirects dashboard, click on the browse button and select the CSV file containing your redirects. Click on the Upload CSV button and activate the redirects using the save button.
Conclusion
Having known how to redirect pages in WordPress using a plugin or by editing your website’s .htaccess, it’s also important to know how you can trail pages that need redirects on your website. These include identifying broken pages on your website, redirected pages, non-canonical URLs, and wrong redirects. Google Search Console does a good job of finding broken links and other link-related challenges on your website.
The use of a plugin for implementing redirects in WordPress is the best option, even among developers familiar with coding. This is because it alleviates the chances of running into errors and allows one to create and take down redirects easily.
Please let us know in the comment box below if you still have any challenges creating a redirect using the above-mentioned plugin or by editing your .htaccess file.