Every new site that’s put up is clean and fast because the code is new. There isn’t much content, scripts or plugins to weight it down. Over time, all of these additions provide a double-edged sword. At the same time, they’re helping you simplify the backend work you’re doing, but stacking them one over the other will clutter everything and making your site difficult to navigate for you and slow to respond for your visitors, and eventually cause errors or even crashes that you definitely want to avoid. To ensure that you’re promptly notified if something like that happens, it’s a good idea to keep software like Better Uptime by your side so you always know if something went wrong.
Even if you’re one of those devs that thrive in their own version of controlled chaos, having a slow site can and will burn you.
Most of the time you’ll need some kind of help to get it back running at optimal efficiency. We’ve found that one such tool is the Asset CleanUp plugin and it works wonders! Keep in mind that speed up your WordPress requires more steps but in this post, we will focus on DB optimization.
Make it fast
There are numerous reasons why you should want your site to be as fast as possible. Most of the reasons are obvious. Your visitors will be happier. Every one of us knows how frustrating it can be to fight your way through a slow site, constantly think which buttons to click and which not to so it won’t slow down your experience even further. Making a site fast will not only make their visit enjoyable but will keep them coming back for more. Since returning customers are crucial for any business, this would be your main goal. More visitors, as well as returning visitors, mean more potential customers, meaning more profit. Any way you look at it, a fast site benefits all included.

Maybe you didn’t know but a site’s loading time is also a factor when determining a rating for search engines. You know what they say – if you want to hide something put it on the second page of Google. Rising your SEO rating will pump up your site as a result in searches making it even more regular to attract those visitors we’ve mentioned in the upper paragraph.
Moving on from the influence fast sites have on your traffic, if you’re using a plugin that specifically targets useless CSS and JavaScript like this one makes your life much easier on the backend. Having less code to work with makes chances for errors smaller, enables you to make more precise and efficient changes and makes those changes easier to test (and pinpoint potential problems). In instances when you’re working with code, a less is more approach is probably always the best route. When you have a tool that does all the work for you, your input is only the selection of what goes and stays, there is no reason to not take advantage of it.
What it does
Asset CleanUp is, in essence, a front-end optimization performance plugin. It lists all elements that are loaded once the page is accessed (CSS and JavaScript files, as well as the inline code associated with them). Now all these elements make up the site and constitute the bulk of what the browser is loading. The reason you’d want to use a plugin like this is that it, after it provides you with a list, gives you the option to disable unneeded elements, making faster and less error-prone.
To get a better picture of how this works, we’ll give a simple example. Let’s say you have a page that has to load 2MB worth of data (occupying 20 files) every time it loads. Now that you’ve got all the elements listed it turns out that around half of that data is useless. Some have been added as bulk actions for the whole site, some are obsolete and some simply have better options available. This plugin lets you disable all those elements and then groups the remaining elements in fever files for faster processing.
Now your site has around 1.2 MB worth of data to load, the code and assets are elegantly stored in only 12 files and you have a generally better-optimized site as a whole. At the same time, this means your site will have a much better speed score and it will be much easier to manage since fewer components mean less chance of something going wrong.
How it does it
Armed with the knowledge of why you should even go through with this process and what actually this specific plugin does, it’s time to go over all the options and setting so you could get a feel of how exactly you’ll be doing all these changes.
Test mode
The first thing you’ll want to get a handle on is the test mode. This is absolutely crucial no matter if you’re a WordPress beginner or an experienced user. Enabling test mode means that all the changes you’ve done are applied solely to you (the admin). No matter what changes you’re doing they won’t be visible to your visitors until you disable the test mode. The test mode is therefore perfect to figure out what can be cut and what should stay. By previewing the page you’ll always be able to see exactly how the tweaks play out.
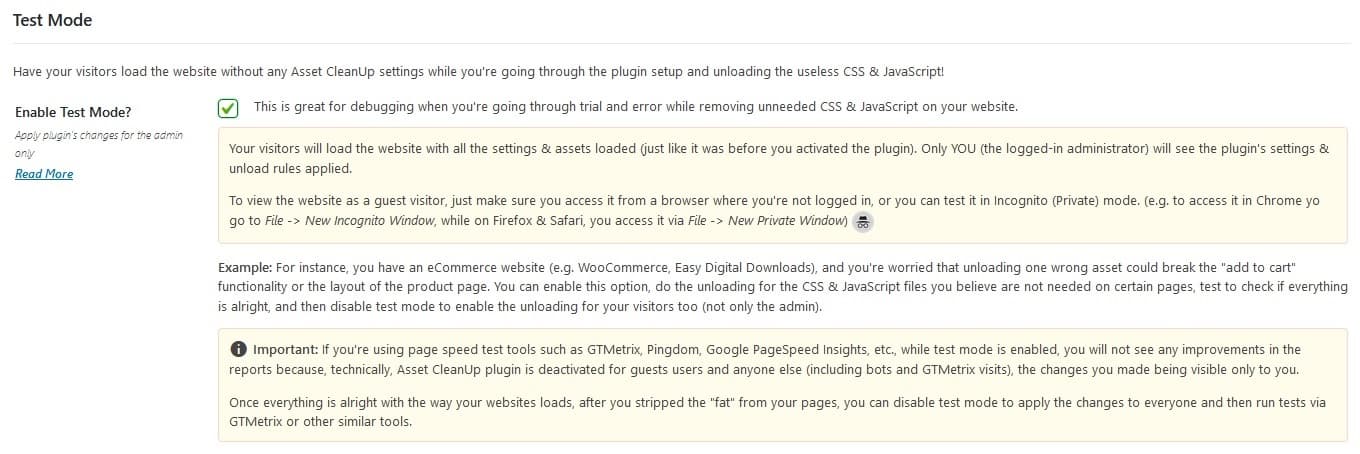
Essentially, you’re getting a test site for your ideas within your regular site. If you’re ever in doubt that unloading an asset is going to upset the functionality and/or layout of your pages be sure to enable the test mode.
It’s important to note that if you’re using speed test tools of any kind, the changes in speed ratings won’t be visible until you disable test mode making the changes apply to all visitors – in this case, visitors meaning bots that help determine the speed rating.
CSS and JavaScript load manager
With the test mode knowledge absolved, we can take a deep dive into how you can sort through and then unload assets.
Since your homepage is much more specific than the other pages on your site, it also has a dedicated settings page. Basically all the options that you have at your disposal for the homepage are available to all other sections of your site, however visually it’s usually different than the rest and can, therefore, have specific options. In any case, you’ll have the ability to customize it differently than everything else.
The following sections of your site, other than the homepage will also have the option to unload assets (posts, custom post type, pages, and media attachments are available in the free version, the rest are premium features):
- Posts – all default post types
- Custom post type – post types generated by other plugins („product“ by WooCommerce for example)
- Pages – all default page types
- Media attachment – all media files from the library
- Categories – all post categories
- Tags – all post tags
- Custom taxonomy – taxonomies created by other plugins („download_category“ by Easy Digital Downloads for example)
- Search – default search template (doesn’t extend to a search page)
- Author – all post by a specific author
- Date – all posts on a specific date
- 404 not found – an error page when a request is not valid
Once you’re editing any of the aforementioned aspects of your site you’ll have additional options. In the example below, you can see the added options on a new page.
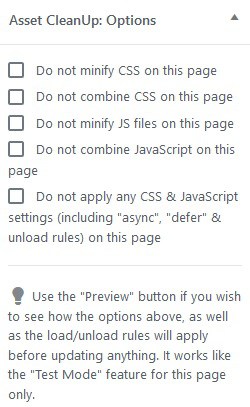
Options for unloading assets are displayed on the bottom of your central editor. All assets that are represented on the site are listed and then it’s up to you to choose which ones you want to keep and which ones you want to unload.
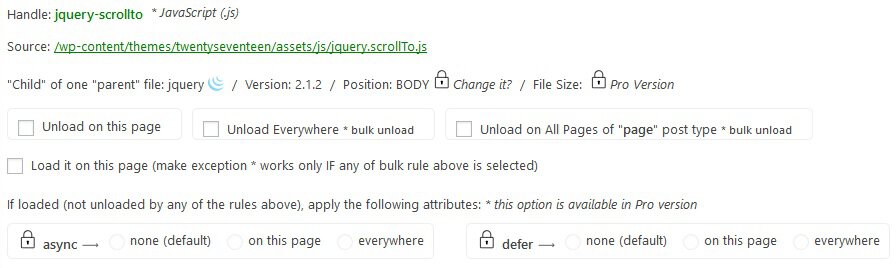
In the example above you can see one asset, but all of them are displayed in the same way with the same options. As you can see, the plugin gives you some basic information about the asset like the handle and source. You can even follow the source to get to the complete code, which is convenient, not having to go through additional menus and tabs.
The great thing here is that all unload options available are present both here in the page editor we’re using as an example and in the general plugin options (which we’ll get to shortly). You can unload the asset from this specific page, unload it from the whole site, or unload it for a specific type. The two latter options are bulk unloads that can, as we’ve mentioned, be edited in a separate field.
In addition to single and bulk unload you also have the option to add load exceptions in case an asset is already unloaded, for instance, site-wide. A good example will be the CSS and JS files of a contact form. If you only need it in the “Contact us” page, then you can unload the files site-wide (on all pages) and make an exception to load them only on the contact page.
Bulk changes
Speaking of bulk changes, once you apply any through the page editor, you can view all their list (for easier management) in the “Bulk Changes” -> “Bulk Unloaded” tab of the plugin’s settings page.
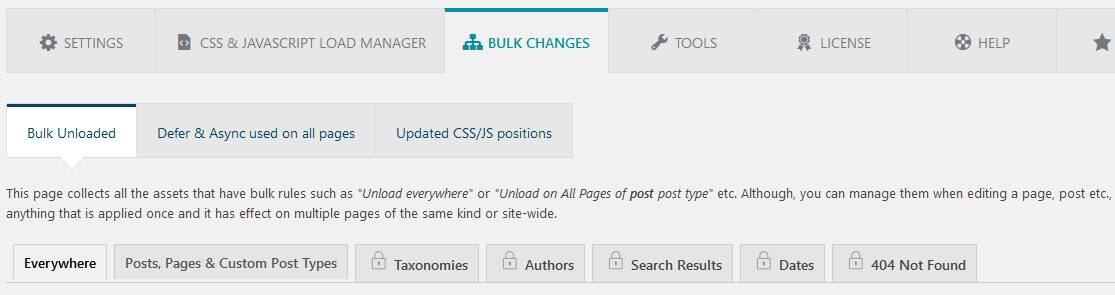
Here you’ll see all the CSS/JS unloaded from the whole site, or just parts of it (centered around post/page types, taxonomy, authors, etc.) if you feel there should be a distinction between them throughout the site. You have the option to remove the unloads (so they will load again). In order to add them to this list, you need to go to edit a page and use one of the bulk rules such as “Unload site-wide”.
These are all options we’ve already mentioned when talking about the editors implemented in the various posts and pages. In this hub, however, you’ll get to see and keep track of all the bulk unloading rules you’ve already set. When looking at it in this regard, the bulk changes tab is a valuable information tool helping you keep track of all the changes you’re making.
Keep track of everything when you’re going through a trial and error run in the test mode checking what works best. Losing track of your work in these instances could prove extremely frustrating and time-consuming, most often leading to abandoning the process and leaving your site in a worse state than it originally was before the changes – avoid these situations at all costs.
Bulk changes don’t apply only to unloading assets. Attributes such as defer and async can also be applied (both of these are premium features) to JavaScript files (script tags). Deferring a JS file actually means that it won’t run until after the page has loaded which will make page rendering much faster as users won’t have to wait until all the render-blocking resources are loaded in order to see the first elements of the page (also known as First Meaningful Paint, a term coined by Google).
This means that when the page initially loads it won’t load everything that’s on it, thus reducing the number and size of the files that need to be loaded and therefore making the startup faster. If your site happens to have multiple media files an option like this could drastically alter the performance of singular pages and the site as a whole.
Async relates to scripts that are running when a page loads up. Normally a script will load evenly from start to finish until it’s done, no matter the strain it puts on the browser. Adding the async attribute that same script will load asynchronously, depending on the available resources at hand. An option like this is of great use when you have non-vital scripts running in the background. Making them load asynchronously means that your primary assets will load up first, after which all the supporting scripts get done. Much like the defer attribute, an option like this is best used on complex sites where you have a bunch of things running simultaneously – asserting priorities in these situations can go a long way.
The bulk actions don’t stop there. You can also change the location of CSS and JavaScript files moving them from HEAD to BODY and vice-versa. This premium function simply determines the order in which the assets will be loaded. Putting vital assets in the HEAD means they’ll be loaded first and only after that will the assets in the BODY be loaded.
Additional speed-up options
If everything we’ve already touched upon still doesn’t satisfy your lofty needs for speed, there are still a few options that can be beneficial in raising that speed rating.
CSS and JavaScript files can be minified and loading them from the cache will have an effect on the speed. This will further reduce the size of the files in question and therefore speed up the loading processes on the site.
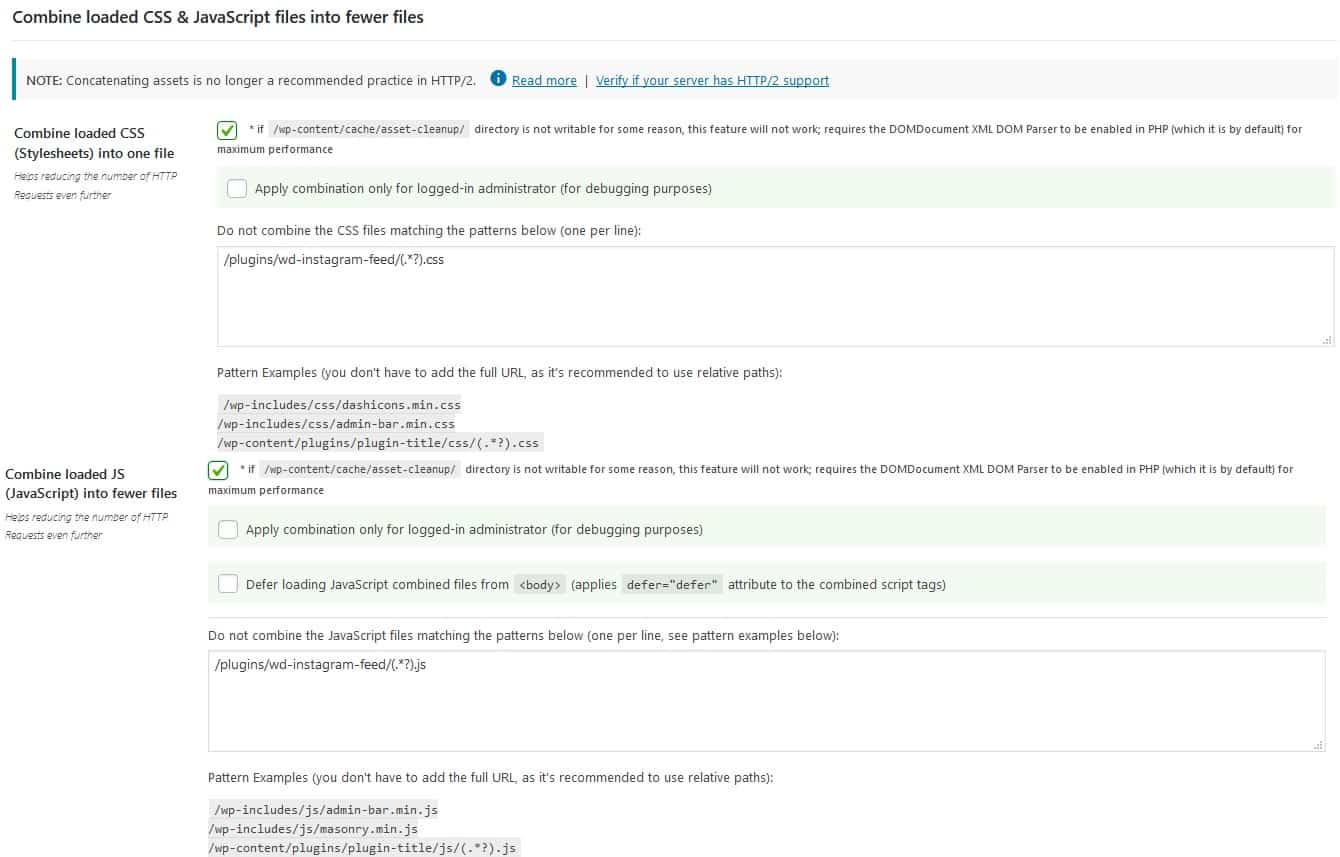
While minifying files reduces their size, combining CSS and JavaScript files into fewer folders helps reduce the number of HTTP requests. You shouldn’t go overboard whit this function, however. Having overly large files can be hard to navigate once they become unnecessarily bloated.
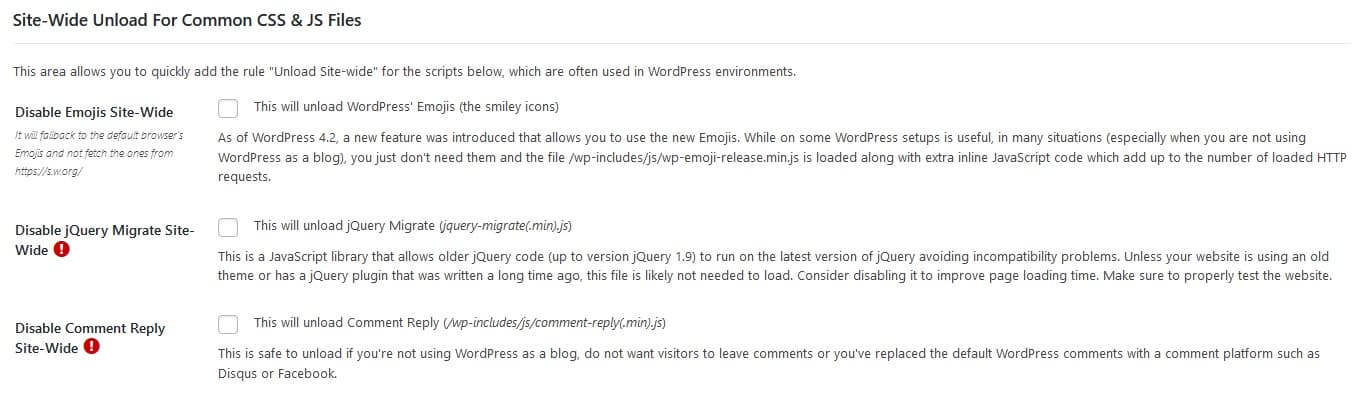
There are certain files that are integrated into WordPress by default that can prove detrimental to the performance of your site. Since they aren’t crucial for everything to work and are more like niche functions they can be disabled site-wide. Very similar to bulk changes, the only difference is that this function targets specific CSS and JavaScript files, so customization is limited.
The HEAD part of any site is loaded first and because of this, it’s prudent to keep it simple and efficient. When visitors see the heading lagging while loading, you’re not going to entice them to stay after that. Similarly, to the default files that are integrated into WordPress and which you can go without, there are elements enabled by default that can be disabled for better performance. This cleanup is specific to just the code between <head> and </head> and it affects the whole site.

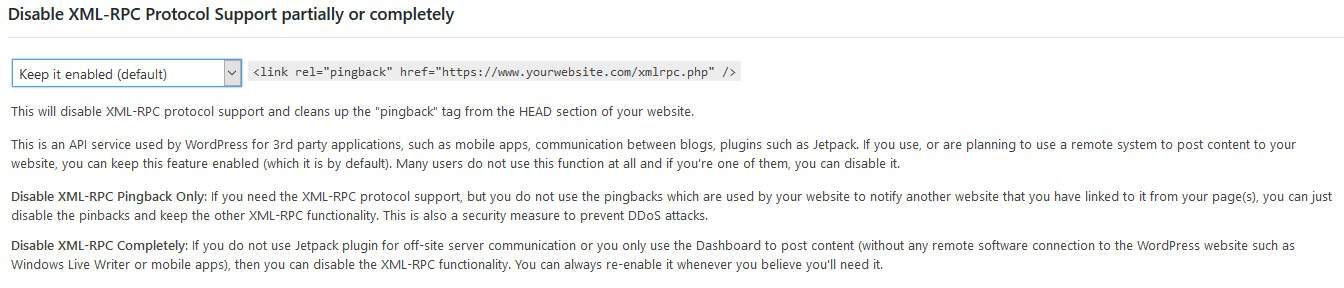
Staying in the HEAD section, the XML-RPC protocol support is enabled by default on WordPress sites. The thing is that there are a lot of users who simply don’t use and don’t need this function. Asset CleanUp lets you disable just the pingback or the whole function in its entirety. This action will give you a bump in loading speeds and if you aren’t using it in any case, there’s no harm in disabling it.
Summary
If you’ve made it this far, you’ll be able to see that the main emphasis with the Asset CleanUp plugin is speed. More precisely making your site faster for your users. Everybody knows that a fast website is something everybody aspires to, but there are problems getting everything to work as it should. Getting down and dirty with the scripts, codes, assets and elements manually is a gargantuan chore, which unfortunately really can’t be avoided. Because of the reluctance to get all the little things sorted you could end up with a festering mess you can’t make heads or tails of.
When it all comes to a breaking point you’ll want a tool like the Asset CleanUp plugin. It will restore both speed and functionality to your site making it more like the one it was at the beginning before everything got off the rails. Anyone working your backend will be happy just as much as your visitors.
I use asset cleanup + festestcache plugion. best combination