There are many image editors for WordPress that extend the wp-admin with very cool functionalities. But how about allowing your site visitors to edit their images before uploading them? Then the choice for plugins is reduced to almost zero.
Image editors for WordPress offer a wide array of features, including the ability to merge photos, making it convenient for users to create captivating visuals and collages directly within their website’s media library, enhancing the overall visual appeal of their content.
Want to give your site visitors the ability to #edit their #images before uploading them? This article will teach you how to make that happen!
Use case: edit a photo before sending it through a contact form
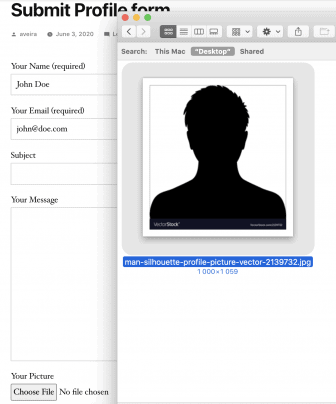
We already had a form created with Contact Form 7. The form data collected was a regular profile form: first/last name, age, gender, etc. And a profile picture.
We wanted to allow the users to edit their profile pictures before sending them. Contact Form 7 does not provide such a feature out of the box, and we also couldn’t find a resolution to this problem online.

Designed by Creazilla
None of the plugins in the directory categorized as “image editor” could do the job? Tested a few of them, all doing the same: extending image editing in wp-admin. Nothing for the front-end.
But one of these plugins stood out as it is simply a wrapper of an image editing service: Pixo. Exploring further showed that this is actually a JavaScript image editor that can be integrated into any front-end.
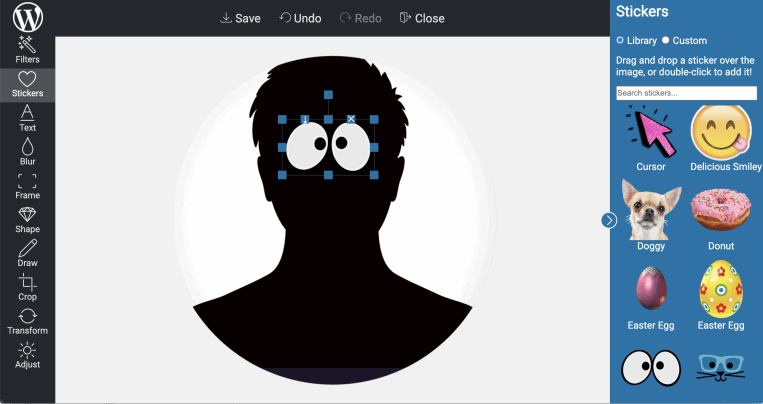
Looked promising. A quick test drive of the demo on the official website proved that it got everything we need: image filters, circle shape, crop, rotate, adding text, even drawing.
Because I wanted to make sure that we can’t use the plugin for WordPress for our desired purpose, I reached out to the support team. Pixo’s support team confirmed that the plugin integrates the image editor only in wp-admin and not in front-end:
“…because there are too many use cases. Everybody wants something different, there are many themes out there, many plug-ins, many custom functionalities, so we decided to let developers integrate the editor themselves…”
Makes sense.
Our form setup
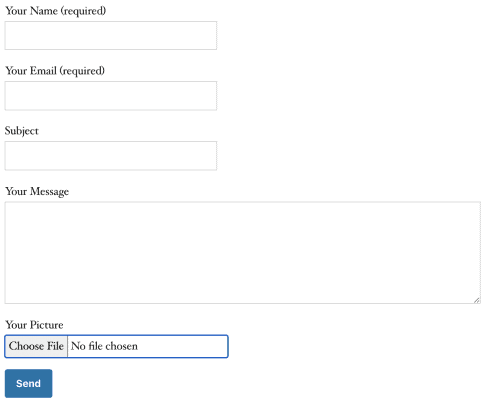
Our form setup is a standard “Contact Form 7” form. Almost the default form, plus a file upload field as you can see from the code below.
<label> Your Name (required)

    [text* your-name] </label>


<label> Your Email (required)

    [email* your-email] </label>


<label> Subject

    [text your-subject] </label>


<label> Your Message

    [textarea your-message] </label>


<label> Your Picture

    [file file-263] </label>

[submit "Send"]
Integrating the Image Editor
So we dived into the documentation. At first glance, Pixo seems to have a very easy-to-use interface, and at the same time is very powerful. The configuration is rich and allows you to configure almost anything.
You can select features, choose a skin (there is a WordPress skin), even completely customize the look by uploading a CSS file with styles. Good one.
Pixo supports a number of input sources: image URL, base64-encoded string (or dataurl), and a file from the user’s OS. Obviously, we had to go with the third option, because of the file input.
We managed to integrate the image editor with only these couple of JavaScript lines hard-coded in our theme’s header:
<!-- header.php -->

<script src="https://pixoeditor.com:8443/editor/scripts/bridge.m.js"></script>

<script>

   window.onload = function () {

      var input = document.querySelector('input[type=file]');

      if (input && input.files.length) {

         var editor = new Pixo.Bridge({

            apikey: 'xxxxxxxxxxx',

            type: 'modal',

            theme: 'wordpress'

         });

         editor.edit(input.files[0]);

      }}

</script>
So far so good: selected an image, opened the editor, added a filter, saved, but nothing happened. We have to handle the exported image via the onSave function.
This function gets the exported image in a couple of formats: dataurl, Blob, and <img /> element. None of them work for our purpose, unfortunately. Well, technically the Blob seems to be exactly what we need, but there is no way to append a Blob to an HTML form.
It can be appended to a FormData object, but this is something different.
We also cannot send an <img /> element with an HTML form. So the dataurl looked like the only possibility as it is a string, and can be appended to a hidden input and sent with the rest of the form data.
For this purpose we added one hidden field to the “Contact Form 7” form using this code:
[hidden edited-file]
And here is the final integration code:
<!-- header.php -->

<script src="https://pixoeditor.com:8443/editor/scripts/bridge.m.js"></script>

<script>

   window.onload = function () {

      var input = document.querySelector('input[type=file]');

      if (input) {

         input.onchange = function () {

            if (!input.files.length) {

               return; }

            var editor = new Pixo.Bridge({

               apikey: 'xxxxxxxxxxxx',

               type: 'modal',

               theme: 'wordpress',

               onSave: function (image) {

                  var hidden = input.form

                     .querySelector('input[type=hidden][name=edited-file]');

                  if (hidden) {

                     hidden.value = image.toDataURL();

                     // clean up the file input so we do not submit the source file

                     input.value = ''; }}

    });

            editor.edit(input.files[0]);

         } } }

</script>
Oh, wait… Sending the form now prints the whole base64 string in the email!
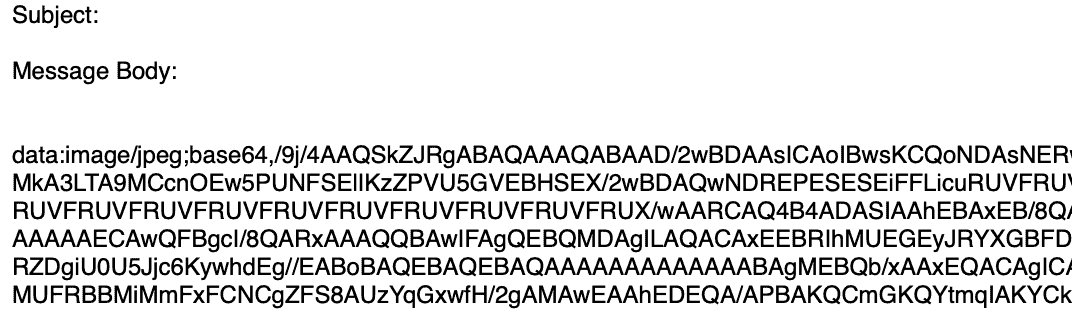
That’s a big problem. So we had to somehow teach the form that this should be displayed as an attachment and not a string.
Plugin hooks to the rescue!
WordPress hooks are great, so are the plugins providing their own hooks. Thankfully, Contact Form 7 is such a plugin. It registers many hooks. The only bad thing is that at the time of writing this blog post there is a lack of documentation about these hooks.
We had to search in the Contact Form 7’s codebase for them and reverse engineer the code, in order to get an idea of how to use them. After a few hours, it appeared that the ‘wpcf7_before_send_mail’ would do the job.
The ‘wpcf7_before_send_mail’ hook intercepts sending the email so we can apply some modifications over the content. Unfortunately, this interception is not that straightforward.
The hook callback receives a $contact_form object which carries the form metadata. But the content sent through the HTML form is not there. To get it, you will have to retrieve the $submission instance.
Contact Form 7 classes follow the Singleton design pattern. So retrieving the submitted data object is achieved with WPCF7_Submission::get_instance() . After that it’s easy: get the submitted base64 string, convert it to a file, and attach it to the email.
Here is the final handle:
// theme/functions.php

add_action( 'wpcf7_before_send_mail', 'attach_base64_image' );

function attach_base64_image($contact_form) {

   // get submitted content

   $submission = WPCF7_Submission::get_instance();

   // get the image base64 dataurl

   $base64 = $submission->get_posted_data('edited-file');


   if (count($base64) > 0) {

      // write the base64 data to file

      $output_file = wp_get_upload_dir()['path'] . '/edited-file.png';

      $ifp = fopen( $output_file, 'wb' );


      // split the string on commas

      // $data[ 0 ] == "data:image/png;base64"

      // $data[ 1 ] == <actual base64 string>

      $data = explode( ',', $base64 );


      // we could add validation here with ensuring count( $data ) > 1

      fwrite( $ifp, base64_decode( $data[ 1 ] ) );


      // clean up the file resource

      fclose( $ifp );


      // attach the file to the email

      $submission->add_uploaded_file('file-263', $output_file);

   }}
The appearance of the form on the front-end:
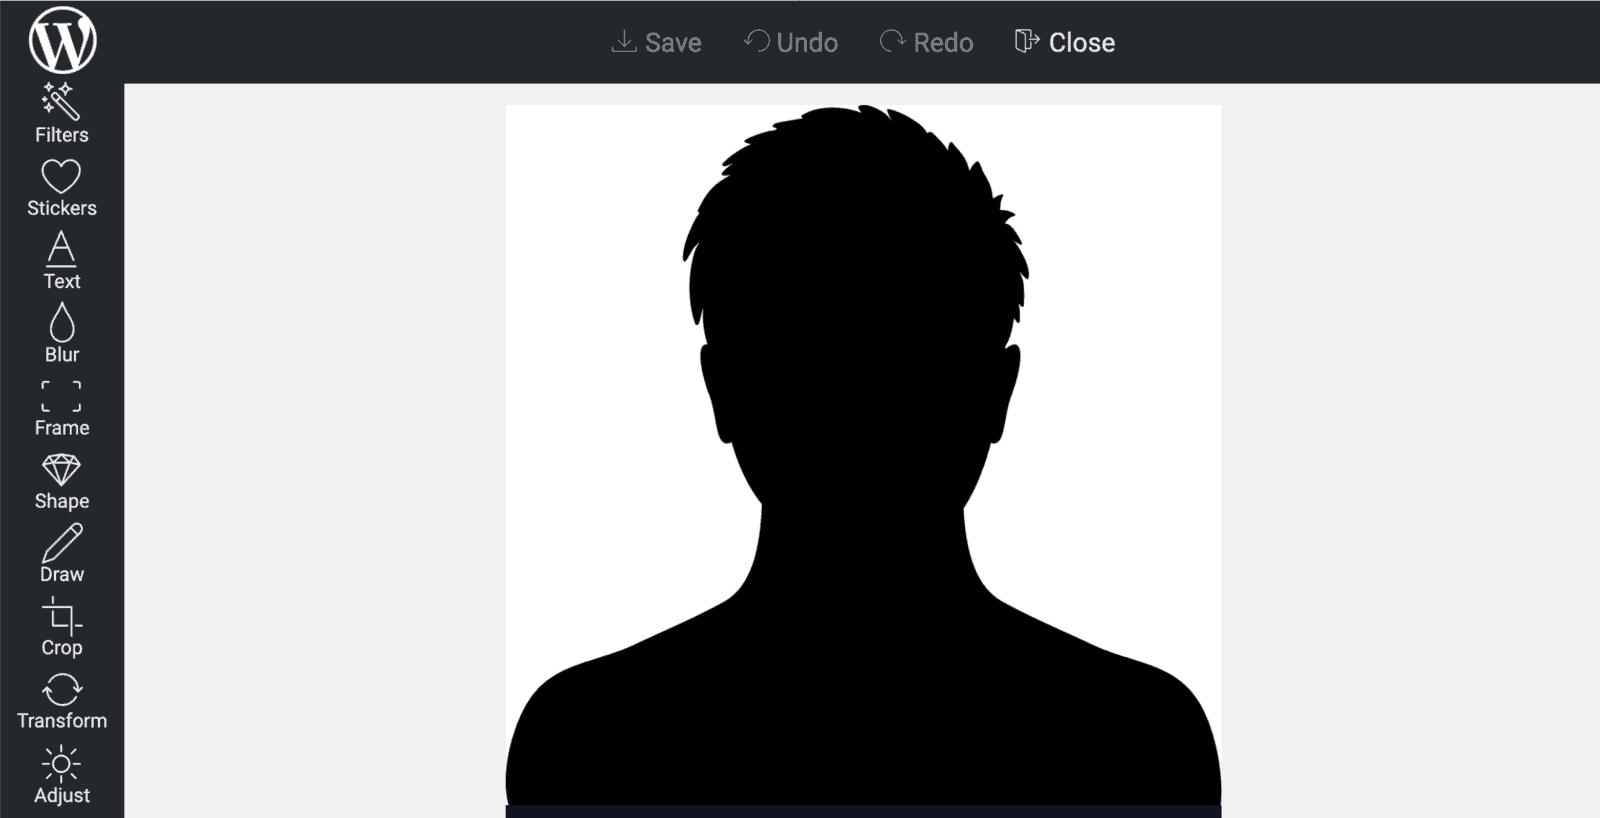
The integrated Pixo image editor dashboard:
The edited image sent from a contact form:

Summary
Pixo is a great image editing tool for a website. Integration is very easy, documentation is thorough and well-written and there are many examples.
The editor is very customizable and has all the essential editing features. And although integrating it with Contact Form 7 was a bit hacky, if you have your own back-end business logic, you can handle uploads in a much more proper way.