Adding keywords and meta descriptions in WordPress is one of the crucial steps to optimizing your website for search engines. These elements help search engines understand your content while attracting users with clear and engaging summaries.
You can enhance your site’s visibility and drive more organic traffic by effectively utilizing keywords and crafting compelling meta descriptions. This guide will walk you through the process, ensuring your content is optimized for better search engine rankings and user engagement.
Why Should You Add Keywords and Meta Descriptions in WordPress?
Adding keywords and meta descriptions to your WordPress site is a simple yet powerful way to boost your SEO and attract more visitors. Here’s why they are important.
- Help search engines understand your content: Keywords and meta descriptions act like signposts for search engines, guiding them to understand what your content is about. This helps your pages appear in the right searches, making it easier for people to find you.
- Increase Click-Through Rates (CTR): Meta descriptions are your chance to catch a searcher’s attention. A well-written description gives users a sneak peek into your content and encourages them to click through to your site, driving more traffic.
- Boost on-page SEO: Using focused keywords in your titles, descriptions, and content makes your site more attractive to search engines. SEO plugins make this even easier, offering tips to optimize keyword usage and improve rankings.
- Stand out in search results: Meta descriptions show up right below your page title in search results, acting as a quick summary of your content. Highlighted keywords within the description can draw even more attention to your link.
How to Add Keywords and Meta Descriptions in WordPress?
Here are the steps to add keywords and meta descriptions in WordPress.
1. Install and Activate Plugin AIOSEO in WordPress
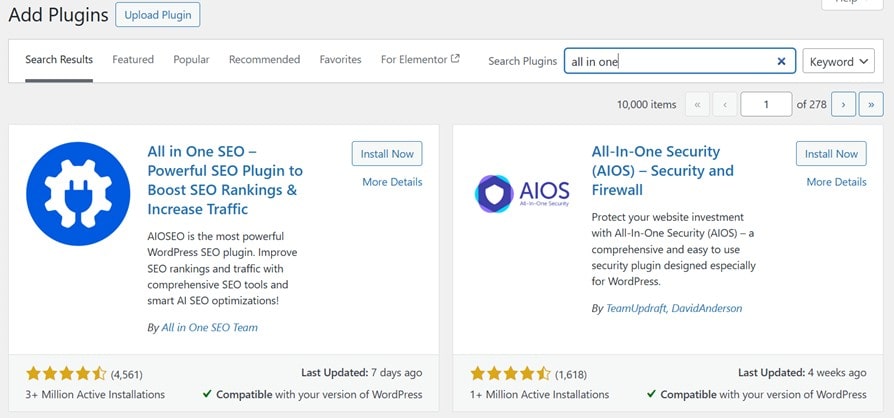
In this tutorial, we’ll use the All in One SEO (AIOSEO) plugin, widely regarded as one of the top SEO tools for WordPress. It simplifies optimizing your site for better search engine performance and offers robust features to help your business grow.
To get started, install and activate the All in One SEO plugin. If you’re unfamiliar with the process, check out our guide on installing a WordPress plugin. Click Install Now and Activate.
2. Activating Meta Keyword Support
To activate this feature, navigate to All in One SEO > Search Appearance > Advanced in your WordPress dashboard and toggle the meta keywords setting from No to Yes.
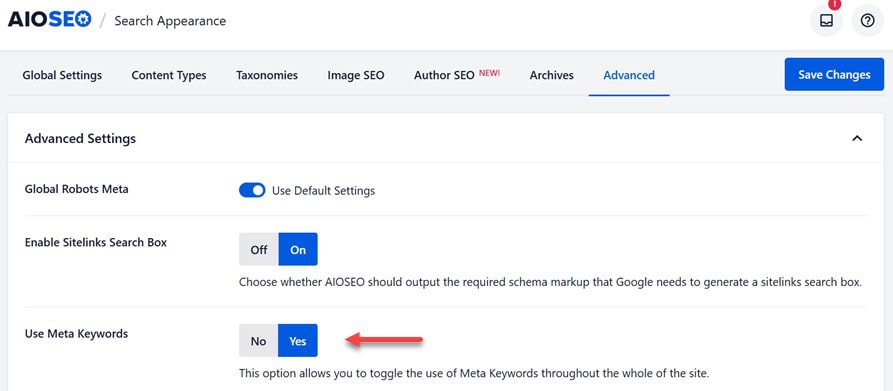
You’ll notice some extra options once you enable meta keywords in WordPress.
You can automatically generate keywords for your posts based on categories and/or tags and dynamically create relevant keywords for your blog posts and archive pages.
Whether or not you choose to use these automated features is entirely up to you. However, you’ll always have the option to manually set keywords for each post and page.
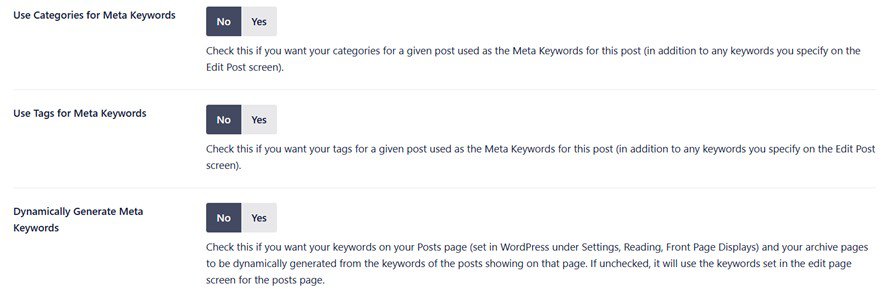
To apply your new settings, click the Save Changes button at the bottom of the page.
3. Adding Keywords and Meta Descriptions on your Posts and Pages
To add meta keywords and meta descriptions, start by editing the post or page where you want to make changes. AIOSEO is compatible with both the WordPress block editor and the classic editor.
On the content editor screen, scroll down until you find the AIOSEO Settings box below the content area.
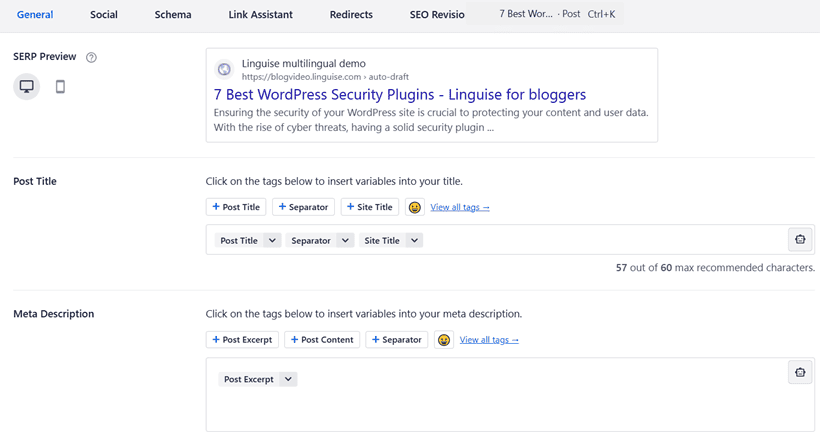
Adding a meta description with AIOSEO
In this section, you’ll notice your site’s SEO title and an automatically generated description, which appears as a snippet. Below that, you will see the Meta Description field.
Enter your desired description into the ‘Meta Description’ field. AIOSEO will track the number of characters you’ve used, which is important because Google typically shows only 160 characters in search results (SERPs).

As you type, the snippet preview will update automatically.
Once you’re done, simply save or publish your post to apply the changes to your meta description.
Using dynamic tags in meta descriptions with All in One SEO
All-in-One SEO allows you to include dynamic tags in your meta descriptions, offering additional customization options. You’ll find tags for Page Content and Separator by default, but you can also use other tags as needed.
For instance, we’ve included the author’s name in our meta description.
Just type the ‘#’ symbol into the meta description box to insert a tag. This will trigger a dropdown menu displaying the available tags.
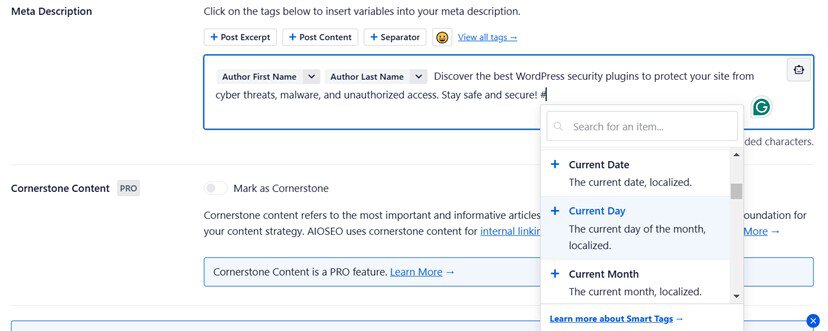
You can select from various tags, such as Current Year, Category Title, Post Date, Post Title, and more.
Using All in One SEO’s ChatGPT integration to generate meta descriptions automatically
To save time, you can leverage All in One SEO’s AI-powered Title/Description Generator, which uses ChatGPT to create high-quality meta descriptions based on the main topic of your content. But you must note that this feature is only available for the Pro version, not the free version.
To begin, click the robot icon in the ‘Meta Description’ field.

If you haven’t used this feature yet, you’ll be asked to create an OpenAI account. Enter your email and follow the simple instructions in the setup wizard to set up your account and link it to All in One SEO.

Image source: wpbeginner.com
Once that’s completed, click the robot icon again. This will generate five meta-description suggestions for you to choose from.
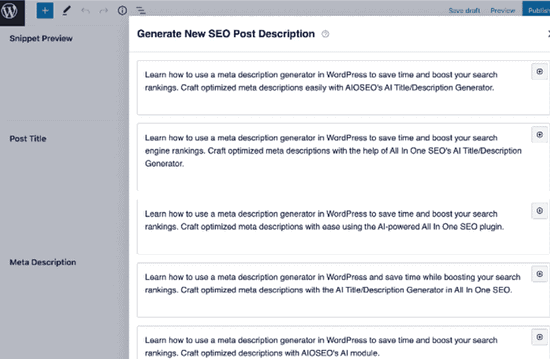
Image source: wpbeginner.com
You can select the meta description you like by clicking the ‘+’ button. It will automatically populate the meta description field, where you can adjust it to fit your needs.
Adding meta keywords to your post or page with AIOSEO
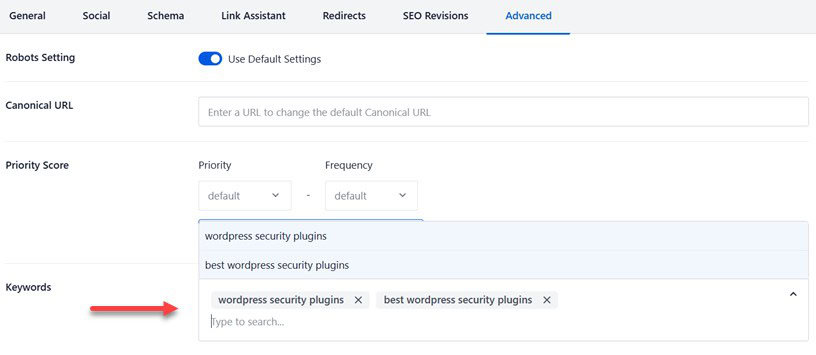
To include meta keywords, go to the ‘Advanced’ tab within your AIOSEO settings.
Type in your relevant keywords, pressing ‘Enter’ after each one. Use keywords closely related to your content only, as irrelevant keywords won’t provide any SEO advantages.
4. Adding Keywords and Meta Descriptions on the Homepage
In the next step, you can easily add meta keywords and a meta description to your website’s homepage in WordPress using All-in-One SEO. Start by navigating to Search Appearance Global Settings in your WordPress admin dashboard. Then, scroll to the Home Page section.
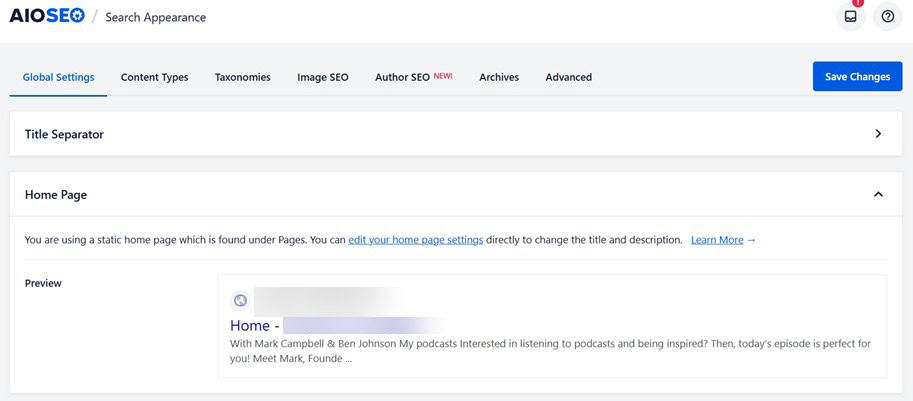
In this section, you can add a meta description and keywords, just as you would for individual posts or pages. By default, All in One SEO uses your site’s tagline as the meta description. You can keep this or customize it to fit your needs.

To make your meta description more dynamic, you can include tags instead of manually typing the site title, tagline, or separator character. This approach is useful because it ensures your meta description is automatically updated if you change these elements later.
Once you’ve added your meta description and keywords, click the Save Changes button at the bottom of the page to save your settings.
5. Adding Keywords and Meta Descriptions on the Category & Tag Archives WordPress
You can also add meta keywords and descriptions to your category and tag archive pages. However, this feature is also available on the paid version, so if it’s still free, you must upgrade first.
Then, go to your WordPress dashboard’s Posts > Categories page to get started and click Edit.

On the category edit page, scroll down until you find the AIOSEO Settings box. Here, you can add a meta description for your category. You also have the option to use All in One SEO’s dynamic tags to customize this description.
To add keywords, click the Advanced tab, similar to how you would for posts or pages.
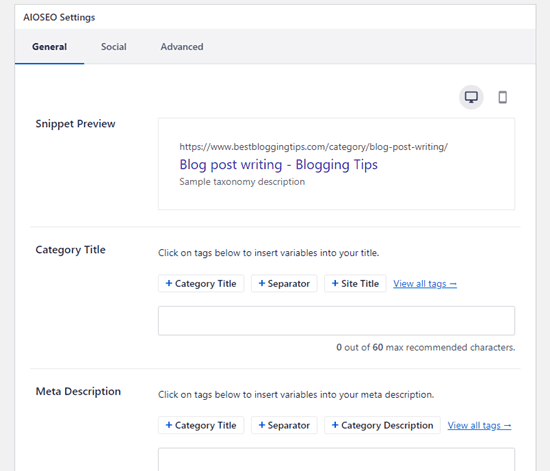
Image source: wpbeginner.com
Be sure to save your changes before moving forward. Once saved, your meta description and keywords will be applied to the category page, which serves as the archive for posts in that category.
You can follow the same steps to add meta descriptions and keywords to your blog’s tags and other custom taxonomy archive pages.
6. Monitor your Keyword Performance Using All in One SEO
Curious about how well your keywords are performing? All-in-One SEO offers more than just adding keywords to your WordPress site – it also allows you to monitor their effectiveness.
With features like Search Statistics and Keyword Rank Tracker, All in One SEO lets you easily check your keywords’ performance directly from your WordPress dashboard.
![]()
Image source: wpbeginner.com
You’ll get insights on metrics such as keyword rankings, clicks, click-through rates, impressions, position history, and more.
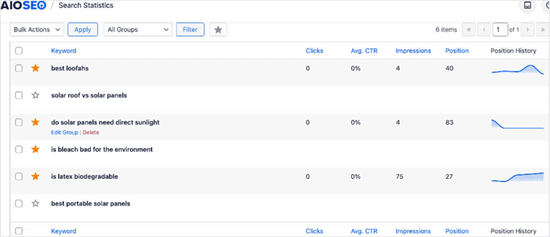
Image source: wpbeginner.com
By tracking these valuable metrics, you can identify what’s working and what’s not, allowing you to fine-tune your keyword strategy to enhance your rankings and drive more traffic to your website.
Alternative Plugin for Add Keywords and Meta Description in WordPress
In addition to the All-in-One SEO plugin we discussed above, there are many alternative plugins that you can use. Here are some of them, both free and paid.
- Yoast SEO
- WP Meta SEO
- Rank Math
- SEO Booster, and many more.
Each plugin has features and ways of adding keywords and meta descriptions to WordPress. You just have to choose according to your site’s needs.
Conclusion
Adding keywords and meta descriptions in WordPress is essential to improving your website’s SEO. Following the steps outlined in this guide, you can ensure that your content is optimized to rank higher on search engines, increasing visibility and user engagement.
But remember that optimizing keywords and meta descriptions is an ongoing process. You should regularly update your content with relevant keywords and compelling descriptions as search trends evolve can make a big difference in your site’s ranking. With tools like All in One SEO or other alternative plugins, you can easily track your performance and continuously refine your strategy to achieve long-term success.