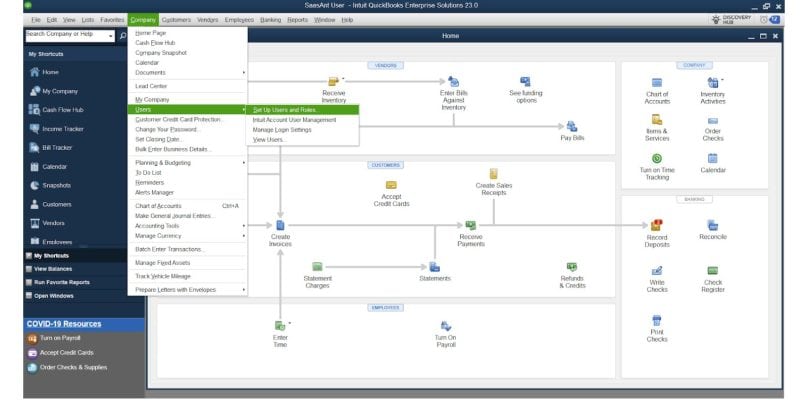
Changing the admin user in QuickBooks Desktop can be an essential task if you’re setting up a new user or if you need to transfer admin responsibilities to another person. The admin user has access to all areas of QuickBooks, including sensitive financial information and user settings, so it’s important to manage these permissions carefully. This guide will walk you through the process of changing the admin user in QuickBooks Desktop, ensuring that you can make the transition smoothly.
Why Change Admin in QuickBooks Desktop?
The admin user in QuickBooks Desktop has full access to the software, including the ability to manage user accounts, view all financial data, and adjust system settings. There are several reasons why you might want to change the admin in QuickBooks Desktop:
- Transitioning Responsibilities: A new person may be taking over the admin role, and their credentials need to be updated.
- Security: If the original admin leaves the company or no longer requires admin access, the role should be reassigned to another user for security reasons.
- Multi-User Setup: In a multi-user setup, you may want to assign admin access to a different user.
Prerequisites for Changing Admin in QuickBooks Desktop
Before making any changes, make sure you meet the following prerequisites:
- Back Up Your Data: It’s always a good practice to back up your QuickBooks company file before making any changes to user permissions. This ensures that you can recover your data if anything goes wrong.
- To back up: Go to File > Back Up > Create Backup.
- Access to Admin Credentials: You must be logged in as the current admin user to change admin rights. If you’re not logged in as the admin, you cannot modify user roles.
- Verify User Permissions: If you intend to assign admin rights to a new user, ensure that they have a User ID set up in QuickBooks. If the user doesn’t have one, create a new user account.
How to Change the Admin User in QuickBooks Desktop

Here’s a step-by-step guide to change the admin user:
- Log in as the Current Admin: Open QuickBooks Desktop and sign in using the admin user credentials.
- Go to the “Manage Users” Section:
- Click on Company in the top menu.
- Select Set Up Users and Passwords.
- Click on Set Up Users.
- Select the User to Become Admin:
- In the User List window, select the user you want to make the admin.
- Click Edit to open the user settings.
- Assign Admin Rights:
- Under the Role section, select Admin from the drop-down list of available roles.
- This will grant full access to the QuickBooks company file, including the ability to modify financial data and user settings.
- Save Changes:
- After assigning the new admin rights, click Save to apply the changes.
- Log Out and Log In as New Admin:
- To confirm that the new admin has the correct permissions, log out of QuickBooks and log back in using the new admin’s credentials.
- Verify that the user can access all areas of QuickBooks, including Company settings and User Management.
How to Remove Admin Rights from the Current Admin
If you want to remove admin rights from the current user, follow these steps:
- Go to the User List:
- Follow the same steps as before to navigate to Company > Set Up Users > Set Up Users.
- Edit the Current Admin User:
- Select the current admin from the user list and click Edit.
- Change Role:
- In the role section, change the user’s role from Admin to another role (e.g., Full Access or Custom).
- Click Save to confirm.
- Test the Changes:
- Log in as the new admin to verify that the changes have been applied correctly.
- Check if the original admin now has limited access according to the new role.
Troubleshooting Common Issues When Changing Admin
While the process of changing an admin user is straightforward, there are a few common issues that users encounter. Here’s how to address them:
1. Admin Change Not Saving
- Solution: Ensure that you are logged in as the current admin. If the changes are not saving, try restarting QuickBooks and following the steps again.
2. Forgotten Admin Password
- Solution: If the admin password is forgotten, you may need to reset it. You can reset the password via the password reset tool in QuickBooks. Go to Company > Set Up Users > Reset Password.
3. Limited Access After Changing Admin
- Solution: If the new admin doesn’t have full access, double-check that the correct permissions are assigned under the Role section. If necessary, manually assign permissions to the new admin.
Securing QuickBooks Desktop After Changing Admin
When you change the admin user, it’s important to ensure that your QuickBooks data is secure. Here are some best practices to follow:
- Strong Passwords: Ensure that both the old and new admin user accounts have strong passwords to protect sensitive financial data.
- User Permissions: Regularly review and update user permissions to ensure that only authorized personnel have access to critical information.
- Audit Trail: Enable the Audit Trail feature in QuickBooks Desktop to track all changes made to the company file, including admin changes. This helps in monitoring who made the changes and when.
Conclusion
Changing the admin user in QuickBooks Desktop is a relatively simple process, but it requires careful attention to user permissions and security. By following this step-by-step guide, you can easily assign or remove admin rights, ensuring that the right person has access to sensitive business data.
If you encounter any issues during the process or have questions about user management, refer to the troubleshooting section or reach out to QuickBooks support for assistance.
Have questions or need help with QuickBooks Desktop? Leave a comment below or check out QuickBooks support resources for more assistance!