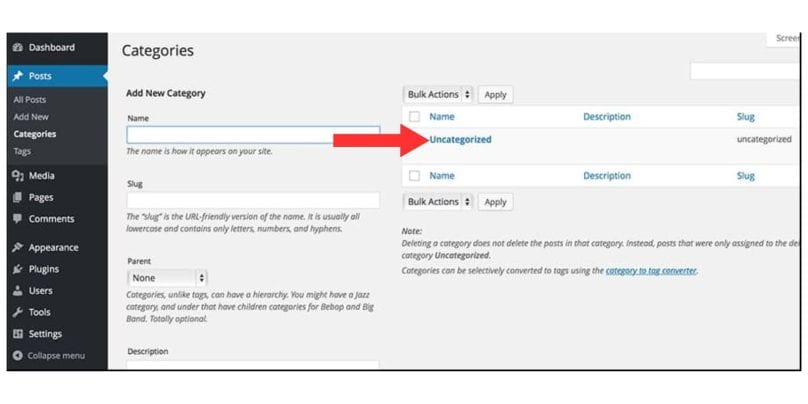
If you’re running a WordPress site, you may have noticed that all new posts are automatically assigned to the “Uncategorized” category. While this default setting can be convenient for beginners, it can make your website appear unprofessional and disorganized.
This guide will show you how to easily remove or rename the “Uncategorized” category in WordPress, so you can maintain a cleaner, more organized website.
What is the “Uncategorized” Category in WordPress?

The “Uncategorized” category is the default category that WordPress assigns to posts that aren’t placed into a specific category.
Every new WordPress installation includes this category, and it’s typically used as a placeholder for posts that haven’t yet been categorized.
While it’s fine for beginners or casual bloggers, leaving posts under “Uncategorized” can lead to a less organized site and affect your SEO (search engine optimization).
Why You Should Remove or Rename the “Uncategorized” Category
Here are a few reasons why you might want to get rid of or rename the “Uncategorized” category on your WordPress site:
- Improved Site Structure: Removing or renaming the “Uncategorized” category helps improve your website’s navigation and makes it more user-friendly.
- SEO Benefits: A custom category can help with SEO by using relevant keywords, improving your search engine rankings.
- Professional Appearance: A website without the default “Uncategorized” category appears more polished and organized.
- Better User Experience: Assigning specific categories to posts helps visitors find content that’s more relevant to their interests.
- Avoiding Duplicate Content Issues: Using a default category can confuse search engines, leading to potential duplicate content problems.
- Enhanced Control: Renaming or removing the “Uncategorized” category gives you more control over how your content is classified and displayed.
How to Rename the “Uncategorized” Category in WordPress
Renaming the default category is an easy way to replace the generic “Uncategorized” label with something more fitting for your site. Follow these simple steps:
- Go to the Categories Section: In your WordPress admin dashboard, navigate to Posts > Categories.
- Edit the Category: Locate the “Uncategorized” category on the list and click on the Edit link next to it.
- Change the Name and Slug: You can now rename the category to something more specific. For example, change the name to “Blog” or “News”. The slug is the part of the URL that identifies the category, so adjust it accordingly.
- Save Changes: After making the changes, click Update to save them.
How to Completely Remove the “Uncategorized” Category
If you don’t want to use the “Uncategorized” category at all, you can remove it entirely. However, before you do that, you need to make sure all posts that are currently categorized as “Uncategorized” are reassigned to a different category. Here’s how to do it:
-
Assign a New Default Category:
- Go to Settings > Writing in your WordPress dashboard.
- Under Default Post Category, select a different category to assign to posts by default. This ensures that new posts won’t be assigned to “Uncategorized”.
- Save your settings.
-
Reassign Existing Posts:
- Navigate to Posts > All Posts.
- Use the bulk edit feature to assign all posts currently marked as “Uncategorized” to a new category.
- Select the posts, click on Bulk Actions > Edit, and assign them to the new default category you set.
-
Delete the “Uncategorized” Category:
- Once all posts have been reassigned, go back to Posts > Categories.
- Hover over “Uncategorized” and click Delete.
- WordPress will allow you to delete the category as long as no posts are still assigned to it.
Alternative Solution: Hiding the “Uncategorized” Category
If you prefer not to delete the “Uncategorized” category but still want to prevent it from appearing on your site, you can hide it. This can be done using a plugin or custom code. Here’s how:
- Using a Plugin: Plugins like WP Hide Post or Category and Taxonomy Converter can help you hide categories from the front end without deleting them.
- Using Custom Code: Add a simple function to your theme’s
functions.phpfile to hide the “Uncategorized” category from displaying publicly on your site.function remove_uncategorized_category($terms) {
if(($key = array_search(‘uncategorized’, array_column($terms, ‘slug’))) !== false) {
unset($terms[$key]);
}
return $terms;
}
add_filter(‘get_terms’, ‘remove_uncategorized_category’);This code will prevent the “Uncategorized” category from showing up on your site without deleting it entirely.
Common Issues and Troubleshooting
Some users may encounter issues while trying to remove or rename the “Uncategorized” category. Here are some common problems and their solutions:
- The Default Category Reverts Back: If your new default category keeps resetting to “Uncategorized”, try clearing your browser cache or check if any plugin is overriding your settings.
- Posts Still Show “Uncategorized”: If posts still show up under the “Uncategorized” category, make sure to reassign all posts before deleting the category.
- The Category Doesn’t Delete: WordPress doesn’t allow you to delete the “Uncategorized” category if it’s still the default for posts. Ensure you’ve set a new default category before attempting to delete it.
Conclusion
Removing or renaming the “Uncategorized” category in WordPress is an easy way to improve your site’s structure and appearance. By following the steps outlined in this guide, you can create a more organized and SEO-friendly website. Whether you choose to rename the category or remove it entirely, make sure your content is properly categorized for both user navigation and search engine optimization.
If you found this guide helpful, leave a comment below and share your experience! Don’t forget to share this article with your friends or colleagues who might need help cleaning up their WordPress categories.